

I can’t decide what bothers me more these days: trying to find a foundation that will cover the sun spots on my cheeks, or feeling jealous when I see the flawless complexion of a freshly spackled millennial. In all honesty, I think the former intensifies the latter.
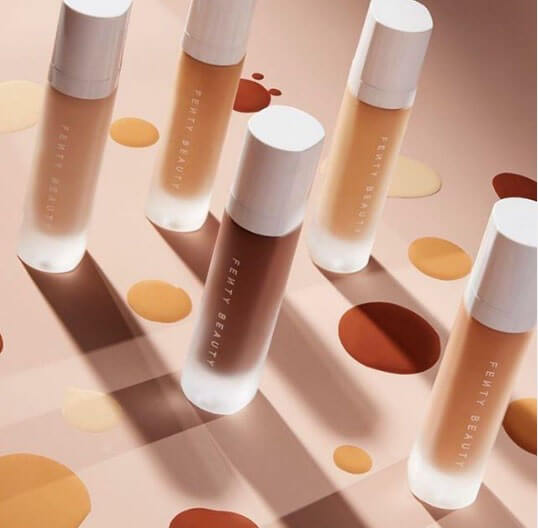
You see, 20-somethings have it easy. They reach for a product, and—barring unusual circumstances, like a bad case of acne—can perfect their faces in one simple fell swoop. My college-age daughter grabs her trusty Fenty foundation (it was launched by Rihanna, whose last name, as it turns out, is Fenty; comes in 50 shades; and has a cult-like following) and a Beautyblender sponge, then camouflages to perfection without looking back. At 50-something, a more carefully assembled arsenal is usually required to accomplish the same task.
All of which assumes that you, like me, enjoy the look of really smooth, porcelain-like skin. There are plenty of women who wear the signs of age as badges of honor—and do it with elegance, and strength, and style. Frankly, I’m not one of them. I chalk it up to having been beauty-product-obsessed since a very young age and love the look of creating a clean canvas with artfully applied makeup. If you’re in my camp, I have a plan of attack that works wonders at defending this flawless face without resorting to acts of aggression (read: needles, knives, or gnashing your teeth).
Read More: Should You Wear More Makeup or Less After You Hit 50? Five Myths and A Truth
1. Begin with a rosy glow. Literally.
One of the hallmarks of youthful-looking skin is a rosy, dewy glow—and, unfortunately, that can dissipate into a dull, dry complexion as collagen production begins to wane. Fortunately, you can get the glow back by jumping on the rose-oil bandwagon.
A few drops do wonders at restoring a luminously refreshed face.
A few drops of this feel-good, hydrating liquid smoothed on before your regular moisturizer does wonders at restoring the look and feel of a luminously refreshed face. Said to be an anti-inflammatory agent, which reduces puffiness and redness, and skin regenerator, rose oil is a brilliant way to get that dewy look without resorting to wrinkle-seeking shimmery highlighters. There are dozens on the market, but I’m kind of partial to Julep’s Boost Your Radiance Reparative Rosehip Seed Facial Oil ($36).
2. Don’t be scared of full-coverage foundation
Almost every beauty article will tell you that it’s best to go light and translucent when you have mature skin; the thinking being, that heavy foundation settles into lines and crevices and actually accentuates the very parts you’d like to cover. This is the reason everyone raves about tinted moisturizers and color control creams designed to let your skin show through. But they’re not for me and here’s why: I don’t particularly want that skin to show through. What with the aforementioned brownish sun spots (resistant to an expensive laser treatment I tried once, by the way), redness around the eyes, and a couple of little broken blood vessels, I’m looking for something that will put those babies in hiding.
Find a foundation that isn’t too drying and apply with a damp sponge.
If you’re going for full-on foundation, the trick is to find a formula that’s not too drying and apply it with a damp sponge (more on this in a minute), starting at the center of your face—where you generally want the most coverage—and blending outward. Make sure your product isn’t over-the-top matte, which will render your dewy rose-oil maneuver pointless. A few to try: Armani’s Power Fabric Foundation ($64); Kat Von D Lock-It Foundation ($35); and Fenty Beauty Pro Filt’r Foundation ($35).
3. Start using that sponge
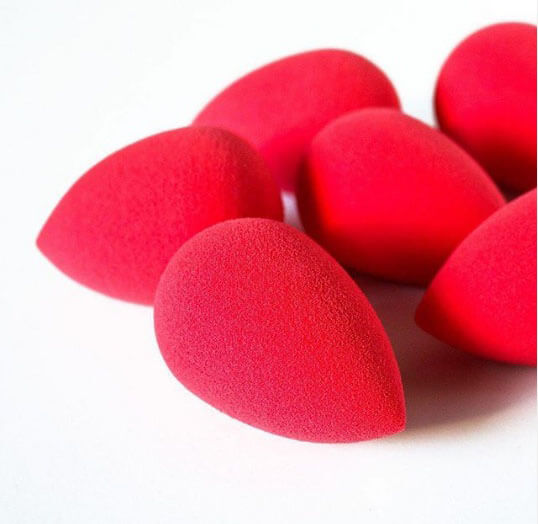
When Amazon.com asked me for more than $20 for a little makeup sponge the size (and shape) of a quail egg, I balked. Especially because I’ve tried similar drugstore iterations over the years and was underwhelmed. But people are paying the money, so I did a bit of digging into the reviews, and, yes, they’re really worth the investment.
$20 for a little makeup sponge? Yes, it’s really worth the investment.
First, you’ve got to get your hands on the real McCoy—The Original Beautyblender—because most of the knock-offs don’t have the same fine texture, which is key to applying perfect foundation. Then you’ve got to thoroughly wet the thing and wring it out. When damp, dip it in a bit of foundation and begin dabbing and blotting … not painting. Those who’ve taken Art History 101 will understand that the technique you’re going for is rather like pointillism—applying smidgeons of color and then gently rocking the sponge so it all blends together into one homogenized masterpiece.
4. Now, hone in on the spots
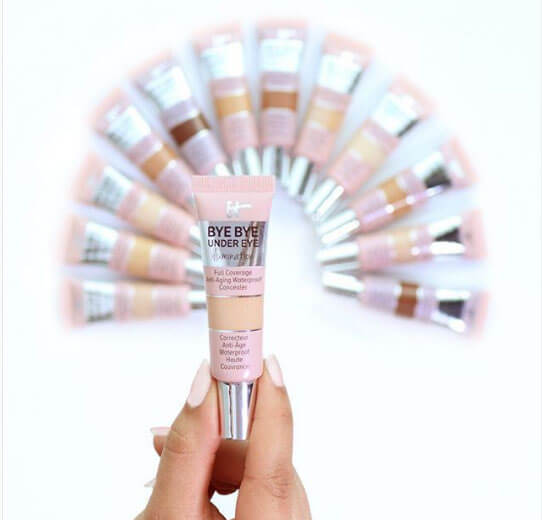
Chances are, you’ve already done a good job of blurring the imperfections. But once your foundation is in place, you can go even more granular on those stubborn spots, redness, and areas of discoloration. (Note: Avoid the temptation to start with concealer, as your application of foundation will simply slide it off its perch.) Melasma (those unsightly brown sun spots) and the redness around the eyes do best with a finger or flat-brush application of no-budge concealer. One of my favorites is IT Cosmetics Bye Bye Under Eye Full Coverage Anti-Aging Waterproof Concealer ($24). You tell it to stay … and it does.
Cover dark circles with vertical stripes of concealer.
Dark circles, however, require a formula with more slip and sheerness, applied NOT in a sweeping arc along the dark line itself (which just draws attention to the problem), but in vertical stripes, which you then pat into the skin until everything disappears. Try Urban Decay’s Naked Skin Weightless Complete Coverage Concealer ($29).
Read More: How to Get Your Eyebrows in Line
5. Time to “bake” your makeup

You’ll hear the industry term “bake” bandied about on a lot of YouTube beauty tutorials; it’s a phrase that originated in the drag community and refers to a technique in which you allow translucent powder to sit on your face for a few minutes while the heat from your skin sets everything. When you dust off the excess—about five or ten minutes later—what’s left behind is pretty damn flawless.
You’ll hear the term ‘bake’ bandied about on YouTube beauty tutorials.
Most people focus on the areas they want to highlight (cheekbones, under eyes, etc), but it’s also ideal for keeping those concealed spots under cover. Simply apply a generous amount of loose powder with your damp sponge, pressing it onto your face in big, bold, obvious “puddles.” I like Make Up For Ever’s Ultra HD Loose Finishing Powder ($36). If done correctly, you will look as though you just had an unfortunate run-in with a sack of self-rising flour. Then go check your email or make an espresso, and when time’s up, gently sweep off the excess with a large, super-soft, fluffy makeup brush that’s been dipped in a bit more powder. Blend within an inch of your life and then—ta da!—marvel at your complexion.
***
Hillary Quinn has worked as an editor at various magazines in New York and is a well-known beauty and lifestyle writer. Her work has appeared in Elle, Cosmo, Bride’s, Good Housekeeping, and many other publications and websites.


0 Comments